Headphone Hygiene – Keeping your headphones clean

How to clean your Headphones and Earphones

headphone hygiene cleaning tips

Headphone hygiene is something that seems to get overlooked. We see a lot of headphones being returned to us because of supposed faults. When all they really needed was some TLC.

Here we’ll go through some of the common issues when it comes to headphone hygiene. In addition we will provide steps you can take to make sure your headphones and earphones are well looked after.

Earphones tend to suffer the most from not being kept clean. This is becuase they fit into the ear canal and they tend to be stored in pockets and bags which are both perfect places to pick up dirt. This dirt can seriously affect the sound and performance.

Blocked Sound Nozzle – Earphones

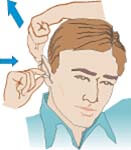
The most common issue is a loss of sound from one or both of the ear pieces. This can either be a complete loss of sound or a slight drop in volume, and is not always the result of a fault. One of the most common reasons for this issue is a build up of ear wax in the sound nozzle of the earphone. There can also be a blockage at the opening of the eartip. Now we know this is not the nicest sounding thing, but you’d be surprised how many earphones are returned to us faulty, when they in fact just needed a good clean.

Many earphones are supplied with cleaning tools. These are great for removing wax or dirt. However, always be careful to not poke the driver or damage the grille that protects it. Be careful when cleaning your earphones in this way, and if it is too difficult – please get in touch and we will be happy to advise.

Typical earphone cleaning tool

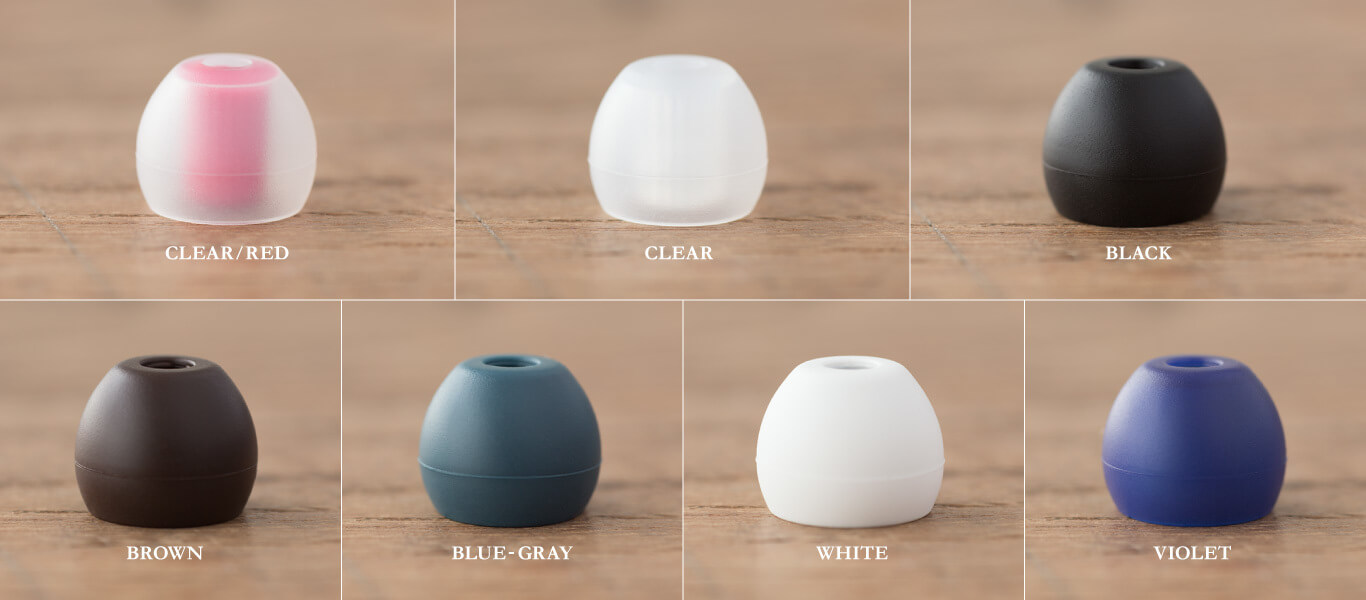
If the eartips are blocked, (the silicone or foam tips that go into your ear), then you can remove them from the IEM and give them a proper clean. For silicone tips, you can even soak them in warm water! If they are beyond saving, then you will be able to find replacement eartips that can be bought as spares. Final, SpinFit, Dekoni and Shure are just some brands that sell eartips separately. We are very happy to help if you are unsure which tips fit your earphones.

Blocked Cable Connectors – Dust and Dirt

Another area where dirt can affect your headphones or earphones, is where the cable connects to the housings. This is only relevant if the cable is replaceable. Sometimes dirt can get into the contacts, breaking the connection between the cable and connector.

So, if you notice sound cutting out from one of the sides, try disconnecting the cable from the housing and check for any dust or dirt. Nothing a good blow won’t get rid of. To be extra safe, you can use compressed air or a manual air pump to do this. Check both the housing socket and cable connector to be sure.

Dust and dirt can also make its way into the headphone socket of your device, whether it’s a phone or portable audio player. To avoid any issues, regularly check the socket for anything that may interfere with the headphone connection and make sure to be careful when removing anything blocking the socket.

Air blower pump example

The best way to avoid a lot of potential issues, is to keep your headphones or earphones inside a case. Not only will this look after them and keep the cable safe and tangle free, cases will also help avoid dust or dirt getting into places you don’t want it to.

Enjoyed our How To on Headphone Hygiene? Check out more guides HERE

Passive Isolation VS ANC

Here’s a question that is asked a lot, and one that many don’t quite understand. What’s the difference between ANC (Active Noise Cancellation) and Passive Isolation? We hope this article helps explain the difference between them.

ANC and Passive noise isolation are very different in how they try to block out unwanted outside noise. ANC uses an electronic circuit and sound waves while passive isolation is a purely mechanical system without any additional sound trickery. But their goal is the same, to allow you to enjoy your music to its fullest, without any unwanted distractions.

Passive Isolation

Both earphones and headphones aim to create a seal around your ears or in your ear canal itself to block out outside noise. Many earphones and headphones have venting on them to help tune the sound signature. But these vents also often compromise the sound isolation of the model – this is mainly in models that use conventional dynamic drivers. Balanced armature models are easier to fully seal and some of these, such as models from Etymotic, offer up extremely high levels of passive isolation that are much more effective than ANC.

Etymotic claim that their ER series earphones offer 35-24 dB of attenuation depending on the eartips and depth of insertion. This is much higher than most earphones. Westone Pro X series earphones offer up around 25 dB of attenuation. Some studio headphones such as the Sennheiser HD380 Pro also offer up to 32 dB of attenuation. However more consumer friendly closed back headphones will likely offer around 20 dB of attenuation.

When it comes to what frequency range is most affected, the bass is the hardest to isolate from with a passive isolation model. In fact only some good earphones can effectively isolate in this region. Whereas ANC does a better job at blocking out low frequency noise. Midrange and Treble regions however are usually well isolated with passive designs, especially in the treble region where ANC designs don’t attenuate very well.

For most uses, passive noise isolation is actually more than enough to enjoy your music without outside distractions. It can be argued that ANC seems to have been pushed via marketing to sell a feature many don’t fully understand. Also, a pair of fully sealed earphones will likely work better than a pair of ANC headphones for example. So it is wise to carefully consider where you will be using your earphones/headphones.

ANC

Now on to ANC, shorthand for Active Noise Cancellation. As mentioned before ANC takes a very different approach to noise attenuation. One that oin fact has some benefits but also some drawbacks. ANC uses external microphones to monitor noise levels and create a phase-inverted sound wave to cancel out the ambient noise before it reaches your ears. This system requires a power source, so will only work if there is power supplied (often via a rechargeable internal battery), and this can make them heavier.

ANC works in tandem with passive isolation normally. If the earphones/headphones already have great passive isolation the ANC circuitry will only help a marginal amount and often compliments the downfalls of passive isolation (low frequency attenuation). However, this does cause some confusion, as some people may think that ANC is not working well if the passive isolation is already high. But due to the passive noise isolation doing a great job already, it will seem like ANC is hardly working. However, if the passive noise isolation is mediocre, then it may seem like the ANC is better on that particular model due to having more of an apparent effect. This backfires if the battery runs out though, as models with high passive isolation can be easily enjoyed with ANC on or off.

Another thing to consider is the environment where the earphones/headphones are going to be used. ANC is best used in environments where there is persistent low-mid frequency noise as this is where they work best. This is why they often work well on planes and public transport where there is a constant background noise. However, they do not handle impulse noises very well and don’t cancel out higher frequency noise as effectively either.

Another issue common with ANC models is wind noise. Some models do not handle wind noise well at all, while others are better. So you need to read up on reviews of specific models to see if this could be an issue. ANC can reduce some low frequency noises up to 60 dB but again this is only in certain environments and frequency ranges. Overall usually only reduces noise by up to 30 dB and puts it in line with most passive earphones/Headphones.

When it comes to sound quality, ANC nearly always has an impact, and it’s a negative one. There is an additional circuit influencing the sound, as much as the designers will want it to impact the audio as little as possible, it still has an impact. Those seeking the best sound quality should stay away from ANC, ANC can create constant white noise and also introduces distortion due to the way it cancels out noise.

So what’s better?

Well, it’s not quite as simple as one being better than the other. For sound purists ANC is never going to cut it, but for your everyday listener ANC will sound just fine. The problem is that marketing has over-hyped ANC’s capabilities and people expect them to cut out everything, which they don’t. Wind noise can be problematic for ANC, as can impulse noises. These won’t be filtered out and people will assume the ANC is poor on such models.

ANC is best suited to constant noise environments where there is a steady low-frequency noise that can be effectively cancelled out. Passive models tend to work better in day-to-day use as they more evenly attenuate outside noises and present the music in a more realistic way.

ANC needs power and consumes a lot if active, this will lower the operating time of any wireless models that have this feature, so if you are not in an environment where it is effective, it is worthwhile leaving it off.

We hope this article has helped clear up some misunderstandings when it comes to ANC vs Passive noise isolation, and if you have any further queries don’t hesitate to get in touch.

Did you Enjoy our Passive Isolation Vs ANC? Check out our other How To’s HERE

JDS Labs Optical input drop-outs with LG/Samsung TV’s

This will be an issue that will effect a few users of JDS Labs DACs, so JDS Labs have issued a statement along with a fix

** We first shared our findings with engineers at LG in August 2021. LG has acknowledged the behavior, but no official resolution has been shared by LG as of December 2021. Please see below for a high level explanation, or skip to Solution. **

Symptom: While using the optical output from an LG C8/C9 or Samsung TV in conjunction with a high-performance DAC, you may experience audio dropouts several times per minute.

Cause: In short, the optical output of symptomatic TVs show pronounced jitter and low level n*100Hz transients throughout the audible frequency range. The default jitter rejection values used by ESS based DACs recognize the extreme noise as signal errors, so the DAC automatically disconnects and reconnects in attempt to achieve a more stable lock of the incoming S/PDIF signal.

This behavior is the result of the ESS’s otherwise excellent jitter recovery logic. The patented jitter eliminator must periodically unlock and re-sync because the digital stream is so poor. AKM and Wolfson S/PDIF receivers are not asynchronous, so they pass along any significant jitter from an optical source, thus, eliminating any chance of a momentary pause for an S/PDIF re-locking event. Re-locks are ordinarily quite rare–you should never encounter this behavior with default jitter rejection values. And under typical circumstances, ESS’s asynchronous jitter elimination results in dramatically higher jitter performance than older DACs without this technology.

Analysis: Audio Precision’s APx555 has the ability to interpolate a digital stream into time and frequency domains to analyze how it would render if perfectly converted from digital back to analog (i.e., without a DAC in the test setup). We used the ASIO4ALL driver to observe SINAD of a 1kHz test tone reconstructed directly from the digital S/PDIF output: 

  • LG 50UN7300PUF Optical S/PDIF Output: 81 dB
  • AsRock Motherboard Optical S/PDIF Output: 141 dB

Solution: DACs featuring asynchronous jitter recovery require relaxed jitter rejection to support noisy optical signals.

For Atom DAC+, please install one of the custom firmware builds below to eliminate dropouts from poor optical signals:

https://jdslabs.com/support/troubleshooting/#category-1-question-3

Eartips! The guide by HiFiHeadphones

So you’ve just invested in some good earphones, but you have no idea whether you are getting the most out of them?

Here is our definitive guide on eartips and first thing first: There are a lot of people who take their earphones out of the box, put them in their ears and think that’s it, let’s listen to some tunes. Little do most people know is that taking a bit time to figure out which eartips fit best. Will help a long way to get the best sound quality from along with a secure fit.

Most earphones have a set of tips fitted to them out of the box, these tend to be a medium size silicone tip – which will fit quite a few peoples ears but it’s worth looking in the box or case for the rest of them to try out the different sizes.

Finding the right Seal

Ear canal width doesn’t seem to depend on how big or tall a person is, so we would recommend trying the smallest size first to see if this provides a good seal – you should be able to tell you have a good seal as they will effectively block out outside noises and when you speak it will sound very odd (occlusion effect). The earphones should not fall out of your ear either, if the tip is too small they will have a tendency to fall out, so try the next size up.

Another way you will tell you have achieved a good seal is the bass should be present, if there is a distinct lack of bass (unless the earphones are specifically tuned this way) a poor seal is often the cause of this problem. A poor seal often is the cause of earphones sounding thin, tinny and lacking body – this is because in-ear earphones rely on an air-tight seal to deliver the sound pressure waves to your eardrum, disrupt this and the pressure isn’t there so you lose out on a big part of the sound.

Lack of Bass?

This is also one of the most common reasons for people returning earphones – lack of bass – and often we find that the other sizes of eartips are still in their packet and haven’t been touched.

When it comes to actually inserting the earphones, with silicone tips you can sort of just push them in, but using the below method to gently pull the top of your ear up and back will allow the canal to open slightly and makes it easier to insert your earphones. With memory foam tips, you need to roll them between your fingers to compress them before inserting and letting the foam expand, there is a small window before them start to expand and with practice you should get used to compressing and inserting them swiftly and efficiently.

Materials – Silicone

The most common eartip material will be silicone, but not all silicone tips are created equal and they come in all sorts of shapes and sizes. More budget earphones will often come with just 3 pairs of standard single flange silicone tips (Small, Medium and Large), more premium products sometimes include different types of silicone tips (different grades / consistency of silicone) or different shapes (bowl, bullet, double and triple flange). Etymotic are well known for their triple flange eartips that offer a deep insertion depth and excellent isolation, at the expense of some comfort. There are a few aftermarket brands of silicone tips that are popular such as Azla SednaEarfit and Spinfit, these both offer premium made tips that are often more comfortable and provide more size options than come in the box of most earphones.

Memory foam

Often also included are memory foam eartips, these have a very different consistency than silicone and often conform to odd shaped ear canals better. Depending on the consistency of the memory foam, these tips do change the sound a little more than silicone tips, often absorbing some of the treble making the earphones sound a little warmer/fuller – this can be a benefit to some but may also rob other models of a little clarity and openness.

Custom tips?

In addition to the above you can often get custom made eartips for many models of high-end earphones, this is something to consider if you wish to have the best comfort and isolation for a pair of earphones you plan to be using for a long time. Doing this means that selling the earphones in the future will be easier than if you decided to go full-custom.

Conclusion

Here at HiFiHeadphones we test and demo a lot of earphones and each member of staff has their go-to eartips. As well as a healthy collection of random ones they have acquired over time it should be added. Some earphones work best with silicone tips, others with foam. But what we do know is that spending some time to find the best tips for your ears definitely helps you to enjoy your music to the fullest. By providing the most comfortable and secure fit for yourself you also get that optimal sound.

Noise Cancelling vs Sound Isolation

What’s the difference between Noise Cancelling and Sound Isolating?

It’s easy to confuse the benefits of noise cancelling with sound isolating headphones. This is easily done, as essentially they are both doing something similar but in very different ways. Because of this you want to make sure you choose the right headphones for your situation – this article will help clear things up for you.

Noise Cancelling

Noise cancelling headphones can reduce the amount of low frequency hum or ambient sounds reaching your ear drums. This can make it possible to listen to your music without having to raise the volume excessively, or even help you get some good sleep on a long journey – they don’t cancel out all noise though. They are useful for people who travel a lot, especially by plane or train as the engine noise can become a nuisance. These headphones use active noise control to cancel out low frequency noise so they will need power; usually using batteries or USB power. Depending on the model of headphone, if the power runs out one of three things will happen:

  • The noise cancelling function will stop running but you will still get sound from the headphones.
  • The sound will completely cut off, you will need to change batteries/recharge to use the headphones.
  • The noise cancelling will stop running and if the speakers have high impedance (require more power) then the sound you get will be faint.

A good example here is the B&W PX5, they are a Bluetooth wireless headphone that feature active noise cancelling (ANC) technology.


Sound Isolation

Sound isolation is a term used for headphones that block out external noise and reduce the amount of sound leaking for others to hear passively (without power), and this is achieved by their build quality and materials used. Most closed back headphones or in-ear isolating earphones do this, and some will do it better than others. Lots of things can improve isolation such as leather ear pads, a good in-ear seal, heavy clamping force (tight fit on the head), acoustic treatment in the ear cups and even the shape and material of the driver housing. A prime example being the Shure SRH840, these have no noise cancelling but for everyday use they block out enough outside noise, making them great for noisy environments.


Summary

Noise cancelling is great in theory, and for long journeys on planes it can be very effective, however it does have its drawbacks. In solving one problem, it creates another, and this is noise and lack of dynamic range in some senses. The other thing to note about noise cancelling is it is only effective against constant background noise, and does not help with sudden loud noises. So it has its uses, but for most people, especially those wanting the best sound, noise isolating headphones are the only logical choice. The company will have put time into tuning the housing to reduce resonance, along with experimenting with different pad materials, to bring you the best sound and isolate unwanted noise.

Open or Closed Back? – How to Choose the Right Headphones

What is the difference between Open and Closed headphones?

Looking for a new pair of headphones can be very confusing, there are so many to choose from – how do you know you are getting the best for your money?

There are lots of things you can look at when deciding, and the main place to start is whether you will benefit from Open or Closed Back headphones. It’s easy for some people to say that one is better then the other, but this isn’t the case – it really depends on how you will use them. If you are looking for a pair of headphones to commute to work with then an open back design won’t be ideal, unless you want the whole carriage to listen to your guilty pleasures. So here is a quick run down on the differences between Open and Closed back headphones.

Closed back headphones

The main benefit you get from a closed back headphone is sound isolation, this reduces the amount of sound that leaks out for others to hear and it also helps block outside noises so they won’t interfere with your listening. This is something that is very important when using headphones in public e.g. commute to work, travelling or even at home with other people in the room. Generally closed back headphones have a narrower soundstage (compared to open back) but you tend to get a punchier sound with heavier bass from a closed back headphone. One downside of closed back headphones is that your ears can get warm very easily, especially compared to open backed headphones – using velour earpads instead of leather can reduce this but this will reduce the amount of sound that is isolated.

Closed back headphones we recommend:

Open back headphones

These headphones certainly don’t isolate sound, being open back the sounds comes out from them like mini speakers – some more than others. They will also allow you to hear what’s going on around you, so this won’t be ideal for noisy environments. The benefit from this is that you get a very natural sound, your ears will keep cool due to the air flow and they give a wide soundstage – this is particularly good for live recordings as you really feel like you’re right there. Being open backed you will sometimes notice a loss of bass compared to a closed back alternative, however the bass has a more natural feel to it because the driver housing is vented so the sound can breathe.

Open back headphones we recommend:

How to choose?

The best question to ask yourself first is “how will I use these headphones?” and from there you will know whether to go for open or closed back. So if you’re using them at home and there won’t be anyone else around then open back will be a good place to look, but if there is a chance that you will also want to use them on the odd commute to work – then overall a closed back will be the most suitable.

Do You Need A Headphone Amplifier?

Do I Need A Headphone Amplifier?

What is a headphone amplifier?

Simply put, every device that allows you to plug in headphones has an amp built in. The amp takes the audio signal and boosts it, allowing us to hear sound through the headphones. Amps don’t only boost volume; they can add and improve qualities like soundstage and separation. Adding an amp to a setup can also bring extra warmth or clarity. This all depends on the quality of the amp and how it has been designed.

The reality is that most people won’t need an external headphone amp. That’s not to say that they wouldn’t benefit from one, though. Smartphones are now a very common music source, and with the technology getting better and better, they do a decent job of delivering good quality sound to most portable headphones and earphones.

There are plenty of headphones designed to be used with mobile phones and other low powered portable devices. These headphones generally have a low impedance of up to 32ohm, and high sensitivity of around 100db, so they are very easy to drive and are more likely to go louder. Remember though: not only do amps add extra power but they can also improve the quality of the sound. So, once you start looking at higher quality headphones, improving your amp will start to make more sense as you will want to get the most out of them. No matter how good your headphones are, the sound quality will be limited by how good the amp is.

Choosing a headphone amp

If you’ve decided to go for a headphone amp, you now need to decide which one to go for. There are many to choose from, and they go for anything between £20 to £2000 and more. Amps can be split into two main groups: portable and desktop.

If you want to add some power to your phone or laptop, then you will want to look for a portable amp. These amps can be charged, and will run off batteries, making them ideal for using on the move. They are also small in size, and there are some out there (like the iFi Audio xCAN) which can connect to the source wirelessly using Bluetooth.

 If you only use your headphones at home, or intend to use headphones that are particularly hard to drive, then you will probably want to go for a desktop amp as they are generally more powerful. Not only are they more powerful, they also tend to have a larger amount of inputs and outputs, making them very versatile. They will need to be plugged it at all times, so will need a power socket to work.

As amps can bring their own character to the overall sound quality, it’s worth making sure you choose wisely and pick an amp that will compliment your headphones. For example, if your headphones have a warm or bassy sound then it’s a good idea to go for a neutral or bright sounding amp. This also works the other way around; a warm sounding amp will complement bright headphones and help to balance the sound out.

Get in touch!

If you have any questions about choosing the right amplifier then please feel free to comment below! We’ll be happy to offer advice on this.

What are custom in-ear monitors?

What are custom in-ear monitors?

Essentially custom in-ear monitors are, as the title suggests, custom made earphones that are moulded to the shape of your ear. Everyone’s ears are different, and to really achieve the most comfortable fit, along with the best isolation, you have to go down the custom route.


Where to start?

So, you are thinking about going down the custom route, first up is the usual research and reading of reviews to shortlist some potential models. The custom industry has grown massively in the last few years, and they are no longer reserved for touring musicians, and there are easily as many audiophile models as there are pro-audio models now.


A few of the main brands are:

  • 64 Audio
  • JH Audio
  • Ultimate Ears
  • Empire Ears
  • Cosmic Ears
  • Custom Art


Once you have shortlisted some, it is worth looking to see if anywhere near you has demo models you can go and try out. As once you have the custom version, you won’t be able to return them.


Next you will need to get some ear impressions done, this is one of the most important parts of the process, due to this we would advise you spend a little more and get them done by someone who is highly qualified in taking ear impressions for musicians. Alternatively most brands will have a list of recommended audiologists, the process is not painful, but it is a bit odd if you have never had it done before.


First, they will check your ear canals are clean enough to take the impressions, and then they will insert a foam stopper past the 2nd bend of your ear canal. Then a 2-part silicone mixture is mixed and inserted into a syringe. You are usually given a bite block to take an open mouth impression (recommended for custom monitors) and the mixture is then injected into your ear and fully filling the outer part too. The silicone takes about 5-10 minutes to cure, then the impression will be removed and you are done.


Now you have your impressions, it’s time to design your monitors (or vice versa)


To be fair, you can order your monitors and then get ear impressions, either way the end result is the same. It is however best to send the impressions sooner rather than later as they do change if kept in storage, reducing the likelihood of getting a good fit the first time round.


You can go on to most manufacturers websites and design your monitors with their online design tools, these are great fun to use and the number of options varies depending on the brand. A lot of them also allow you to upload artwork if you want a specific logo on them. Take your time and make sure you pick a design you love. There are companies like Custom Art that are happy to surprise you if you don’t know what design to go for, they do some incredible pieces.


Now the wait…..


Your customs arrive, you are keen to try them out, but wait, how do they fit in?


Most brands include a leaflet to help you, but there is a technique to inserting custom monitors, you have to twist them in until they lock into place. Here is a great guide on the fitment of Custom monitors: https://theheadphonelist.com/custom-in-ear-monitors-fit-guide/


Now you have your own unique earphones that with some care will last you years and give you excellent sound quality, along with increased isolation and comfort when compared to universal models. Happy listening!

Headphones Vs Earphones Guide & Video

Headphones vs Earphones

Hey everyone, John here. This may seem like an obvious topic, but there are a lot of differences between headphones and earphones… some of which are not as obvious as you may think.

Headphones

Starting with the shape and size. Headphones, as the name suggests, fit on your head, and have a headband that sits on top of your head. At either side of the headband, you have the speaker housings or earcups. The earcups hold the speaker drivers, and are designed in one of two ways: on-ear and over-ear. On-ear headphones have the earcups sitting on the ear and tend to be smaller in size, making them ideal for portable use. Over-ear headphones are larger and have the earcups completely surround the ear. Because of this, they tend to be used mainly indoors or where there isn’t much movement needed.

Earphones

Earphones are a lot smaller, and sit in the ear or in the ear canal. There are three main types of earphones:

Earpods / Earbuds

The older earphone design, or newer earpods, rest in the ear without going into the ear canal. This fit means that you are less likely to create a good seal between the earphone and your ear, resulting in an open sound that can tend to be a bit bass light. This fit also means that they will not isolate sound very well, meaning you are more likely to hear what is going on around you and people nearby will be able to listen to your music. Not ideal for public transport, but liked by sports users as it can be useful to hear your surroundings.

In Ear Earphones

In-ear isolating earphones have a deeper fit and will go into the ear canal, they also have eartips installed. This not only helps to keep the earphones in place, they also help create a good seal which improves isolation and sound quality, especially bass performance. In-ear earphones are the most common fit, and there are two ways of wearing them depending on the design. Cable straight down, and cable over the ear. The cable-over-the-ear design tends to provide a more secure fit and deeper insertion into the ear canal. This way, you will benefit from better isolation. Still, a lot of people prefer the cable-straight-down design as they are easier to use.

A quick note on bass performance. It is very important to make sure that you achieve a good seal when using in-ear isolating earphones. If you do not do this, the main effect to the sound will be a loss of bass… and nobody wants that. When this happens, the sound can come across very tinny and flat, so make sure you try all of the supplied eartips to ensure you’re getting the best sound possible from your new earphones.

Custom In Ears

Lastly, you have custom in-ears. These earphones are customised to fit your ear specifically. This is the best way of achieving a perfect seal, which hugely improves isolation and sound quality. This is done by having a mould of your ear taken, and then used to make an earphone that perfectly fits the shape of your ear. This is a more expensive option and is currently only offered by a small number of manufacturers.

Sound

There is also a big difference between how headphones and earphones sound. I wouldn’t say that one is better than the other. The overall experience is different and people will favour one over the other.

Headphones tend to deliver a more natural listening experience. What I mean by this is that with the speakers being away from the ears, sound is delivered in a more natural way. With our ears playing a part in capturing the sound, similar to how we hear day to day. Headphones can also deliver a bigger or wider sound due to the size of the drivers used and them being away from our ears.

With the speakers being so close to the ear, or even inside the ear canal, the experience from earphones is very different and can take a while for some people to get used to. Due to the fit being so close to the ear, and much smaller speakers being used, earphones are capable of delivering a very high amount of clarity and detail. Sometimes this can be overwhelming, especially for those who have never used earphones before. The close fit also means that sound can come across narrower and feel like it is coming from inside the head when compared to a headphone.

Conclusion

Ultimately, it comes down to taste and how you want to listen to your music. Both headphones and earphones can be used in a large number of situations, and whether you prefer using headphones or earphones – there will be a model out there for you.

Hi Res Audio Explanation & Video

What Is Hi-Res Audio – The History of Digital Audio

Hi-Res audio has now become a standard feature when looking for a new audio device, whether that’s headphones, earphones or portable players. It has also become a rating for high quality music files. That little gold logo has become very important… but what does it mean?

Audio Formats

To understand what hi-res audio is, it’s worth having a basic understanding of digital audio and how it’s recorded. The majority of music we listen to these days, at some point during the recording and mastering process, has been made into digital audio. Once upon a time, audio was recorded onto tape and then cut straight onto vinyl, a completely analogue process.

Nowadays music is mainly recorded onto computer drives using software like Protools, Ableton or Logic. Tapes are still sometimes used to record onto, but they tend to be transferred onto the drive as well. The recorded audio is converted into digital audio and then stored on the drive to be edited in the software.

Historically, digital audio has been available in a number of different file types. MP3 and AAC are not hi-res formats. They are early developed file types that compresses audio data in order to achieve small file sizes: convenient for storing on devices with minimal storage, while compromising on sound quality. Nowadays this compression is used on streaming services such as Spotify and Apple Music, so it’s worth knowing that however convenient they are, the sound quality will be compromised.

There are four main file types which are capable of storing hi-res audio. They are WAV, AIFF, FLAC and ALAC. The quality of these file types can range from 16bit CD quality audio up to the highest hi-res audio quality. WAV and AIFF are raw, uncompressed formats which are not commonly used for general listening due to the very large file sizes. FLAC and ALAC are the most common formats for hi-res audio. They are both lossless compression formats, which means the file sizes are much smaller and they can store metadata, which is all the information about the piece of music.

Bit Depth and Sample Rate

Now the complicated part. Before hi-res audio became mainstream, music was typically recorded with a bit depth of 24bits and a sample rate of 44.1khz or 48khz. The bit depth determines the number of bits of information in each sample and the signal to noise ratio, while the sample rate determines the number of samples of audio taken per second. If you want to know more about bit depth and sample rates, I would suggest you do some research online, as there are a lot of articles on this. Alternatively, you can ask us down below and we’ll do our best to answer.

The digital audio on a CD is always 16bits and 44.1khz.  This is a standard process for CD, and was calculated by very smart people to get the best from this format. Before hi-res audio was a format we could easily listen to, CD’s gave us the best digital audio quality, with Super Audio CD’s providing the hi-res audio of its time and an early glimpse of DSD audio.  We’ll save that for another video. Now thanks to portable audio players having high quality DAC chips and also very large, expandable storage, hi-res audio is something we can all experience wherever we want.

Unlike CD quality, hi-res audio has a minimum bit depth of 24bits and a sample rate of up to 192khz. To achieve this, the audio has to be recorded at a much higher sample rate than was done before. This requires a lot more storage, as the data is much larger.

The upside to this is that the higher bit rate provides more dB of dynamic range, meaning the 24bit recording has a dynamic range of 144dB compared to the 96dB provided by the 16bit CD recording. The result is more headroom for peaks at the recording stage, avoiding the risk of clipping. It also gives a greater separation between the recorded audio and the noise floor.

Using a larger sample rate will increase the amount of samples taken of the audio per second, and this is where it gets tricky. The higher the sample rate, the higher frequencies a system can record. So a sample rate of 44.1khz reproduces frequencies of up to roughly 20khz, and increasing the sample rate will increase the frequencies that can be produced. Technically this seems like a no-brainer as more information can be captured during the recording process, making sure to grab all the detail possible.

Conclusion

The argument to this is that we can only hear frequencies up to 20khz, and that’s pushing it. So why would we need more? Well that seems to be a subject where no definite answer has been determined. Please feel free to give your opinions to this below.

Right, here we are. Is hi-res audio worth all the fuss? If you have a very good set of headphones or earphones, and you use them with a very nice portable player or plug them into a high end home system, then I’d say that you will notice the difference between CD and hi-res audio. On the other hand, if you listen to music on your phone using the earphones supplied with it, or you listen to your music wirelessly, CD quality will probably be as good as you need. Saying that, most people still listen to Spotify and seem very happy with it, so what do I know? And don’t even get me started on vinyl or we’ll be here all week.

Bluetooth 5.0 Explanation & Video

New Video: The History of Bluetooth & 5.0 Explained

Since the invention of Bluetooth, it’s gone through many versions (well, 5 to be exact). But what do they all mean? Before a new version comes out and makes this video old news, here’s a rundown of what makes Bluetooth 5.0 so special.

To fully understand how far the technology has come, here’s a bit of a Bluetooth history lesson.

The History

Bluetooth 1.0

Bluetooth 1.0 was released back in 1999, and as you can imagine, it was pretty limited compared to what we are used to now. Back then, though, it was quite groundbreaking. The technology made it possible for compatible devices to transmit data wirelessly over short distances and using minimal power. It was first used in mobile phones and PC cards, allowing mobiles to connect to Bluetooth headsets for hands-free talking, and for PCs to communicate with wireless mice, keyboards, digital cameras and printers.

Bluetooth 2.0

For all its achievements, Bluetooth 1.0 was limited when it came to audio. Low data speeds meant that speech was just about the limit: transferring music required a higher data transfer speed. Skip to 2004, and we say hello to Bluetooth 2.0 and EDR, or Enhanced Data Rate. The big change here is increased data speeds, from 0.7Mbps to a whopping 3Mbps thanks to the EDR technology. Another improvement was to the maximum wireless range – this was increased from 10m to 30m. To this day, 3Mbps is the maximum connection speed. There have been other improvements over time, though.

Bluetooth 4.0

The next big jump was in 2010 with the release of Bluetooth 4.0, increasing the max range to 60m and introducing the use of Low Energy. This allowed for quick bursts of data transfers to be done with the use of even less power with relatively high data speeds of 1Mbps, opening the doors to Apple and Microsoft: bringing Bluetooth to the big leagues. Version 4.0 went through a few of its own updates, improving security, speed and efficiency until 2016 and the release of Bluetooth 5.0.

Bluetooth 5.0

Bluetooth 5.0 shows how quickly this technology is advancing, with the max range being quadrupled to 240m and Low Energy data speeds doubling to 2Mbps. Boosting the range and reducing power usage has meant that Bluetooth can be used on a larger number of different devices, allowing them to transmit large amounts of data at high speeds with little power being used – and it’s only going to get better. Bluetooth 5.0 also enabled a new dual audio feature – allowing users to stream audio to two different devices at the same time from one source.

Backwards Compatibility

It’s amazing to see how much Bluetooth has improved in just 20 years, and even more impressive is that the smart brains behind it has managed to keep the technology backwards compatible. This means that no matter what version of Bluetooth your devices have – they will be able to communicate with each other. Just remember that being backwards compatible means that you will be getting the benefits of the lowest Bluetooth version – so it’s always worth making sure your devices have the most current version of Bluetooth to get the most out of the technology.

Summary

To summarise, the main improvements gained from Bluetooth 5.0 are:

  • Longer transmission range – Increased to 240m from 60m.
  • Higher data transfer speed – Bluetooth Low Energy speed doubled to 2Mbps, allowing all audio devices to communicate with reduced power usage.
  • Dual Audio – Allowing you to play audio on two devices at the same time from one source.

What are USB earphones?

Some of you may have seen that there are a few earphones sporting a USB-C connector, or even a Lightning connector for Apple devices, but how do these actually work?


Well, all devices that have a headphone jack have internal circuitry that uses a DAC (digital to analogue converter) and then a headphone amplifier. The quality of these components varies a lot between devices, but most suffer from a certain amount of noise and hiss that is detrimental to the overall sound quality.

USB-C or Lightning earphones have this circuitry built into the connector itself, meaning the phone sends the digital data to the earphones and the conversion is done there. This gives the earphone maker a chance to match the specific circuit to a specific pair of earphones/headphones for optimal power and quality. This also means that the circuit is detached from the main board which is a common source for interference and noise.

Whilst not as common as Bluetooth models, USB earphones are on the rise and are an excellent choice if you have a device that has no headphone jack. They offer better sound quality than Bluetooth models along with being more convenient than using a dongle or external DAC/Amp.

Within our range of headphones, we have the new SoundMAGIC E11D which includes a 24bit capable DAC, along with a 4-core cable for balanced signal transmission. These have been getting great reviews in the press, being some of the best USB-C earphones available on the market.


If you don’t mind adding an extra device to get that extra bit of quality out of your regular wired earphones, then take a look at the Cyrus SoundKey. This little DAC/Amp gives you a great step up in clarity and control.

Upgrade your Grado’s with Shipibo


Shipibo wood cups, aluminium gimbals, rodblocks and leather headbands are all excellent hand crafted upgrades for your Grado headphones. They also provide a great base for a custom Grado style build for use with 3rd party drivers.

Shipibo Audio is the creation of Przemyslaw Nyczaj and Michal Czok, created to provide perfect products that stand out in the world of custom headphones. They craft all their products in house in Poland.


Cups:

Lets start off with the main product, the Zebrawood cups. These cups are Grado RS style that have been CNC milled on the inside, and hand turned on the outside to provide a perfect finish. These cups have tight tolerances inside and this means that your drivers will be a perfect fit. You can use liberated Grado drivers from the Prestige or Reference series; or 3rd party drivers from Symphones, Nhoord, Elleven Acoustics and Turbulent Labs.

In this build I have used Symphones V8 drivers.

The drivers slot right into place, you can use a layer of tape around the edge of the driver to make it a snug fit. The cups have a small opening to route a cable through, alternatively you can drill it out a little and fit connectors for detachable cables.

The grills are press fitted into place, and everything is flawlessly finished, these cups are produced to a very high standard. They have not ruined the grain by using a gloss varnish on them.

Sound wise cups do not change the sound drastically, but I have compared these to a Spalted Tamarind cup and these are ever so slightly fuller sounding. These are however a huge upgrade to your current Grados, and one that does not cost the earth. They will alter the sound a little over Metal or Plastic stock cups, as the resonant frequency is slightly different. I found moving to wood cups brings out a little more air, but also a more realistic timbre and body to the sound.

Rodblocks and Gimbals:

These are a prototype of the slim style rodblocks, and because of this they do have slight differences to the production models. However for a prototype they are perfectly machined with tight tolerances once again. The headband screws into place, and the slider tension can be adjusted by screws to keep them in the same position on your head.

The Gimbals have screws on each side to hold the cups in place, they are sandblasted on one side, and plain aluminium on the other. They are a perfect fit, and feel much more substantial than the stock plastic gimbals.

Apart from the cosmetic upgrade, being able to lock the rods in place to keep them the right size for your head is a huge bonus.

Note: The new rodblocks and gimbals have been treated with microarc oxidation which created a ceramic layer on them. Ceramic microarc coating is generally recognized for high hardness, wear resistance, and corrosion resistance, so you won’t have to worry that your new parts will get scratched. So these parts are scratch-proof, but come only in bright silver matte colour.

Slim + Classic

Leather Headbands:

There are 2 types of headband padding being made, one is a slim size which is similar in width to the original Grado padding, and the other is wide which is also thicker.

For this main build I used the slim pad, as it looks similar to the stock pad, but if you are making a heavier build, or want to upgrade your PS series headband the wide would be perfect.

Both pads are hand made, they are easy to install and offer a large upgrade in the comfort department. The padding and leather is soft and the weight is distributed more evenly, these headband pads are such a simple upgrade, yet one that makes your headphones a lot more comfortable.


Conclusion: Firstly it is excellent to see another company producing Grado style parts, there are too few. Also people do not realise that for a modest price you can build a headphone from scratch that will compete with models a lot higher priced, with minimal work involved.

Shipibo parts are well priced in the market, superbly finished and simply excellent.

Build your own Grado style headphones

Build your own Grado style headphones tutorial with Symphones V8 drivers

  • Do you have a pair of Grados?
  • Have you upgraded them to wood cups?
  • Are you looking to build your own Grado style headphones?

If the answer to any of these is yes, then read ahead.

So who are Symphones? Symphones started off modifying Grado headphones with their original Magnum modifications. They then went on to develop Grado style drivers that slot right into most Grado cups and aftermarket cups. Today we are looking at the V8 drivers, their latest offering that are very different in design to the V7.
A big part of driver tuning is adding dampening materials to the diaphragm and magnet, and the new V8 have a completely new driver coating.

The V8 drivers in this review are installed in Rholupat spalted tamarind cups with a Grado SR60e headband and SMC connectors to allow for detachable cables. The cable used is made from Van Damme minature starquad.

So what do you need?

Some Symphones V8 Drivers: https://www.symphones.com/shop/symphones-v8

You will then need suitable cups to install the drivers in, the drivers will fit into all Grado cups excluding the PS/GS series. Please take care when removing the old drivers as to not damage the cups you will be installing the drivers into.

Alternatively you can buy wooden cups from a couple of places:

https://www.etsy.com/shop/ShipiboAudio

http://www.rholupat.com/

http://www.ellevenacoustica.com/

https://wabisabiheadphones.wordpress.com/

Once you have the cups you need a headband with gimbals from your old Grados, or a Sony MDR7506 headband. Alternatively Rholupat and Shipibo offer nice leather headbands and also aluminium gimbals and rodblocks.

The Symphones drivers will need soldering to your cable of choice and installing into the cups, to make sure they press fit tightly you may need a strip of insultion tape around the edge of the driver. I have installed SMC connectors into the cups so I can change cables if I need to.

Now you come to earpad selection, Grado OEM pads, or generic cheap eBay ones, take your pick but they all change the sound.

Symphones have tuned the V8 drivers to be used with OEM G-Cush pads, and the main review will be based using those.

Generic G-Cush pads add a little more body to the sound, but are not as detailed and clean sounding as the OEM G-Cush pads.

OEM L-Cush pads also work very well with these drivers, giving them the more aggressive Grado style sound, over the more spacious G-Cush sound.

———————————————————————————————–

READ MORE: Grado SR80e Headphone Review

———————————————————————————————–

Sound:

  • Bass:

The bass is not as full as the newer E series of Grado, but it is more controlled and also extends lower, digging right down into the sub-bass with ease. The bass is still quite Grado like being about quality over quantity but it is cleaner and more separated. The bass never encroaches on the midrange, and the punch is really good on the V8 drivers. Changing the earpads affects the bass the most, with generic G-Cush and OEM L-Cush pads adding a few extra dB’s of bass which may appeal to some people. The bass is more dynamic and full on the V8 drivers than the lower end Grados, sounding more realistic in tone.

  • Midrange:

The midrange sounds like a veil has been lifted, comparing to the Grado lineup you need to go to the PS500e at least to get this level of detail however the V8 are more spacious sounding. They still have the slightly aggressive tone to them, but are far more open soundstage wise. The upper midrange is not quite as upfront as Grados, leading to a slightly less fatiguing sound and also very minimal sibilance unless the recording has it. The midrange sits ever so slightly behind the lows and highs quantity wise, but not enough for it to be classed as recessed. The clarity and separation of the V8’s is what sets them apart from the original Grado drivers.

  • Treble:

The treble from the V8’s is smoother and more refined than the peakier Grado drivers. In terms of quantity it is still up there with most Grados however they are better separated and airy, with less peaks and more effortless extension. I never find them to be grating and they compliment the rest of the sound perfectly. If you are used to more bassy headphones, yes these will sound a little bright, however I find the highs to be quite well balanced with the rest of the range.

  • Soundstage and Imaging

More precise and also quite a lot wider than original Grados which are more direct and in your face. There is a lot of air between intruments and percussion comes through with excellent tone and control.

Conclusion:

These are an excellent upgrade for your current Grados or for a scratch build, they offer a more vivid and dynamic sound over original drivers. They sound as if a veil has been lifted from the whole sound, and the soundstage and imaging is far superior to lower end Grados. Articulate and dynamic lows, crystal clear midrange and sparkly highs, all that you love from Grados but supercharged.

The Importance of Getting a Good Seal with In-Ear Headphones

This is one of the most important things to consider when using in-ear headphones, but unfortunately it is overlook by a large chunk of the consumer market. We buy things and expect them to just work out the box, but just like your shoe size, we all have different ear canal sizes.

So many times have I seen people comment on lack of bass from models well known for their excellent bass response, the common factor is trying them out of the box with the tips that are pre-installed, and not trying any others. I beg you to try all the different tips to find the one that fits the best.

In-ear headphones will only work if properly sealed, as this will give you the optimal bass response, and also isolate the best from outside noises. If you think about it, if you have a bass speaker in a small room it will sound fuller than if it were in an open space. The same goes for in-ear headphones, if there is a break in the seal the bass will be the first thing you lose.

The bass response of this room is likely to be poor; lower frequencies are the first to disappear given the chance – and forget isolation!

Different headphones come with different types of tips, most come with only standard silicone tips, but some come with a pair of Comply memory foam tips, and also dual and triple flange tips. Using foam tips such as the Comply or Blackbird tips, the tips conform to your inner ear better than regular silicone tips, so it may be worth trying some of them out before making up your mind on the headphones. I also personally find foam tips to be more comfortable, and they isolate from outside noise better, but they do have a tendency to tone down the treble a little.

Everybody’s ears are different, and a good play around with the various sizes and types of tips will certainly be worthwhile. Also the placement of the tip within the ear can be experimented with; try a small tip which is inserted into the ear canal. Or perhaps a larger tip placed against the mouth of the ear canal might suit you better.

Personally, I’ve settled before on a small tip in my right ear and a medium one in my left; it is quite common for our ears to be slightly different sizes so feel free to mix n’ match.

The best way to fit your in-ear headphones, is to lift the top of your ear gently as you insert them, as this opens your ear canal a little. Once you let go they should seal fully, and then you can experience the best audio quality from your in-ear headphones.

It’s always a shame to receive a pair of in-ear headphones which has been returned by a customer, and to find that they haven’t been thorough with the eartips. So make sure you are getting a good seal to get the most out of your headphones. Lack of bass? Try some different tips.